Before and After

White Balance

White balance is a small adjustment that can make a huge difference to your images. To put it simply, white balance is how your camera attempts to make white things look white in your photos. This impacts how all the other colours look as well. Most cameras do this for you automatically, but you can’t always trust your camera to get it right. (In fact, I rarely do.) You might have noticed some photos taken in the shade look really cool, or blue. Or maybe you’ve noticed that your photos of snow look grey instead of white. One of the most obvious cases of the camera not managing white balance well is indoor photos taken in artificial light, for example, lamplight. They look really yellow, right?

There are a lot of ways to control your white balance, both with your camera and also with post production software like Photoshop, or free programs like Picasa. Most DSLRs provide you with the option to select settings like “cloudy” or “flourescent”. You can also do custom white balance by taking a photo of a grey card and letting the camera define that as neutral. Up until recently I was leaving white balance up to my camera’s auto white balance setting (the grey card is a bit of a hassle), especially because I most often shoot children who don’t wait for me to do a custom white balance. However, now I use Kelvin settings to define the white balance for my camera and I’m really liking it. I examine the light, and then determine the appropriate Kelvin temperature setting and input that into my camera. What’s nice is that if the preview of my images looks just a tad warm or cool, I can do a minor tweak of the Kelvin number which normally fixes it. Sorry if I’ve rambled on too much about this! I’m drawn to both the creative and the geeky sides of photography but I understand that not everyone is.

So, onto today’s Before and After. It was getting late and I hadn’t yet taken Eliza’s 365 photo today. So, I grabbed my camera and we went into the backyard. I also grabbed my new sunhat… thinking maybe I could get a cute photo of her wearing it. She ran out the door like a little girl on a mission, and I coaxed her into the pretty patch of sunlight by our clothesline, putting the hat on her. What I neglected to do was make sure I had my camera settings right, both for exposure and white balance (I shoot in Manual mode). Eliza had the hat off and was running away from me within seconds, so not having my camera ready was a big mistake. I quickly snapped some shots anyway and adjusted on the fly, hoping for the best. To make a long story short (or is it too late for that?) my favourite photo was overexposed and the white balance was too cool. Take a look at the shot straight out of camera:

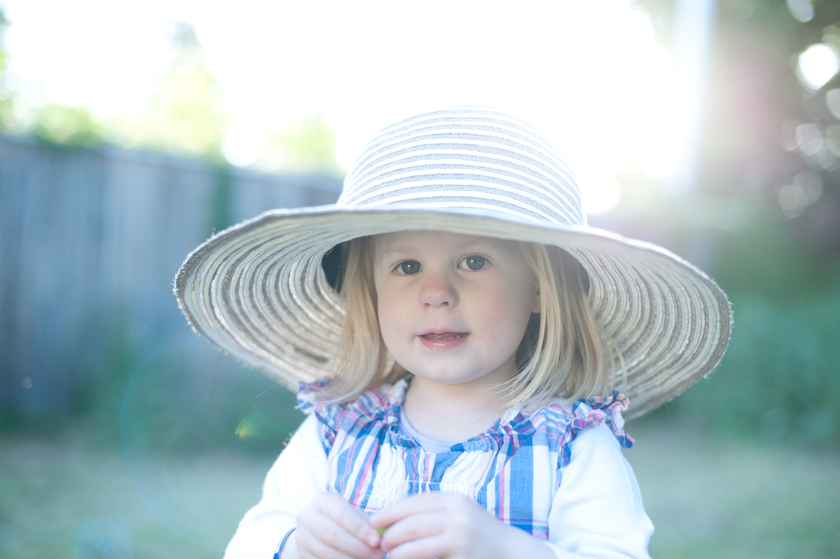
Now, the good news is that I shoot my photos in RAW format which allows me much more flexibility in the amount of changes I can make in post production. Especially with things like exposure and white balance. It is always best to try and get these things right in-camera, but nice to be able to make fixes in post production when things don’t go as planned. So, with some exposure adjustments, and warming up the white balance I was able to get an image with a very different (and better, in my opinion) look:

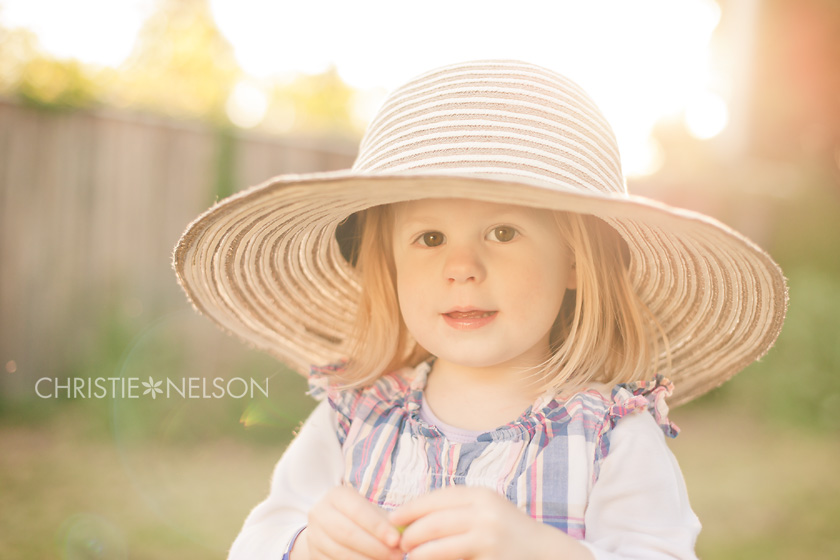
You can really feel the warmth and light of the sunset in this version. In fact, I might have even pushed it a little warmer and pinker than what would technically be correct (if there is such a thing). It’s fun to get creative ๐Ÿ™‚ If you’ve never tried playing around with the white balance in your photos, why don’t you give it a try?

Carolyn - October 20, 2011 - 6:23 am

Great post! I’ve just started to use Kelvin and love it!!

Before and After

Who doesn’t enjoy a “Before and After”? I love seeing the impact post-processing can have on an image. I’ll enjoy occasionally sharing these on my blog.

Here is the final, edited image. This was my 365 snap for today. Eliza rode a scooter for the first time ever and thankfully I had my camera handy ๐Ÿ™‚


This image was shot at IS0 400 | f/2.2 | 1/3200sec.

Here are the adjustments I made to the original image.
In Lightroom:
– Adjusted exposure and white balance
– Recovered some blown highlights
In Photoshop:
– Cloned out the fountain behind her head (I found it distracting)
– Adjusted her skin tone (reduced redness, brightened)
– Added a tiny bit of contrast
– Increased vibrance
– Straightened and cropped, added a slight vignette, my time stamp and saved

Here is the before and after comparison:

I just love the post-processing side of digital photography workflow. I find it so interesting and fun to experiment with different creative touches to my images.

Abbey - October 18, 2011 - 4:34 pm

You are AMAZING!!!
Congrats on the website Christie. It’s so beautiful, and very easy to navigate. I love it. All the best, give Eliza hugs for me.
Xox,
Abbey

Christie - October 18, 2011 - 7:55 pm

Thank you Abbey! Hugs delivered. ๐Ÿ™‚ Christie

Project 365


A project 365 is, as the name suggests, a challenge to take one photo a day for an entire year. When I became more involved with photography I followed a few of these with interest, but never considered taking up one myself.

At the beginning of this year (2011) I decided to try one, but instead of the 365, I was going to do a project 52 instead. A photo a week seemed a lot less intimidating. I made it until the third week, I think.

The idea of doing an ongoing photo project simmered with me for awhile after that, and I began seeing other inspiring 365 projects. Importantly, I wanted to try one having to do with my little girl Eliza, with the goal of capturing her daily “moments”. I started shooting these intentionally, and eventually I realised I had done a couple of weeks in a row! I guess the idea that daily activities can be habit-forming has some merit afterall. Taking the daily photo was becoming more fun, challenging and inspiring than I could have ever expected.

I encourage you to try a 365 if you’re interested in further developing your photography and pushing your creativity. You don’t need a fancy camera; a lot of people do their 365 with a camera phone, which is great because it’s always with you. You don’t have to start on January 1st either. I think I started in early May… And, even though I am not even halfway through my year, I can already see so many ways this project has benefited me. I won’t even go into the fact that my subject is a squirmy 2-year-old who has no idea how to pose. I certainly wouldn’t use the word “cooperative” when describing her as a subject. I challenge myself to try and find new photos each day, which means I constantly need to find unique ways to capture her interacting with the world. Having to shoot every day forces me to deal with less-than-desirable shooting conditions, especially living in a house as dark as mine.ย  But, the most exciting outcome of the project is the photos, which document a time Eliza will probably never remember, but one day be able to relive through these images.

My work on this project has definitely influenced how I approach portrait sessions, with a goal of turning day-to-day experiences into something beautiful. And if you really want to know, yes, I have missed a day. One day! On September 18 I did not take a picture. I didn’t even realise I had missed the day until a couple of weeks later when I was catching up on my post-processing. I blame it on jet lag, or just pure exhaustion.

If you want to follow along with my daily photos, they’re linked at the top of this page. Thanks also to my Facebook friends who have “liked” and commented on my photos. It makes my day, and makes the effort even more worth it. If you have your own 365 project, I’d love to see it… feel free to add a link in the comments section of this post.

Finally, I’ll leave you with today’s photo. Michael, Eliza and I walked down to the lake this afternoon. There was a lot of fluffy pollen blowing around and I thought it might make a good photo; however, I ended up liking this one the most. I think she would have walked over this bridge 100 times had we not stopped her.

Newborn Sessions

I’ve had a few inquiries about newborn sessions. I love doing newborn sessions! My style, however, could be a bit different than what you expect from traditional newborn photography. So, here’s some insight about what a newborn session with me will be like (and what it won’t be like).

During your newborn session, I probably won’t:

  • Put a giant flower on your baby’s head,
  • Photograph your baby as if s/he is suspended from a tree branch,
  • Put your baby in a strange or unnatural environment, or
  • Use unconventional props.

Now, don’t get me wrong. I’ve seen newborn images with all of the above done beautifully. It’s just not my style or preferred way of shooting.

Instead, for your newborn session, my goal is to:

Provide a way for you to remember those teeny-tiny, unique newborn features forever.

Capture the precious moments of your baby’s new life, as you experience them yourselves.

Document your new family in your own environment.


Some other things to consider when setting up your newborn session:

  • Babies are at their sleepiest during their first two weeks. Let’s try to set up a session then, so we can get some good sleeping shots.
  • Newborn sessions may take longer than the usual 1-2 hours. That’s OK. We’ll work around feedings and nappy changes, and all the other surprises bub might have in store for us.
  • Life with a new baby is crazy, I know.ย  It can be tempting to write-off this type of session as “too hard”. Just remember that they’re only this tiny for a short period of time – and being as sleep-deprived as most new parents are, you might enjoy putting the photography into my hands, so that you can sit back and relax.

Please contact me using the link at the top of this screen if you’d like to learn more about setting up a newborn session.

jennifer - October 8, 2011 - 2:42 am

Beautiful photos of a sweet baby! Excellent job at capturing the details!

Sabra - October 8, 2011 - 3:02 am

These are lovely–makes me wish I had a newborn to cuddle!!

F a c e b o o k